
For some time it has been our mission here at the Castle Yumblog to create the perfect sourdough loaf – a subtle alchemy of simple and ancient ingredients – flour – water – salt – animated into being by wild airborne yeasts, and sculpted into final form by that most primitive of the elemental forces, fire (gas mark 9). A breathing entity with a soft chewy sour centre and brittle crusty exterior. A thing of beauty. A joy to behold. There have been many failures along the way – stillborns, dullards, freaks, dribbling atrocities and occasionally an abomination of such hideous visage it wouldn’t have looked out of place in a frock at the Young Conservatives’ summer ball.
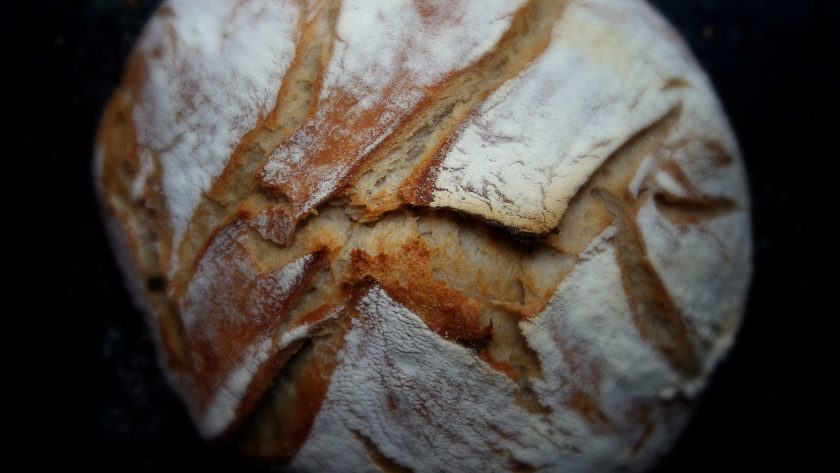
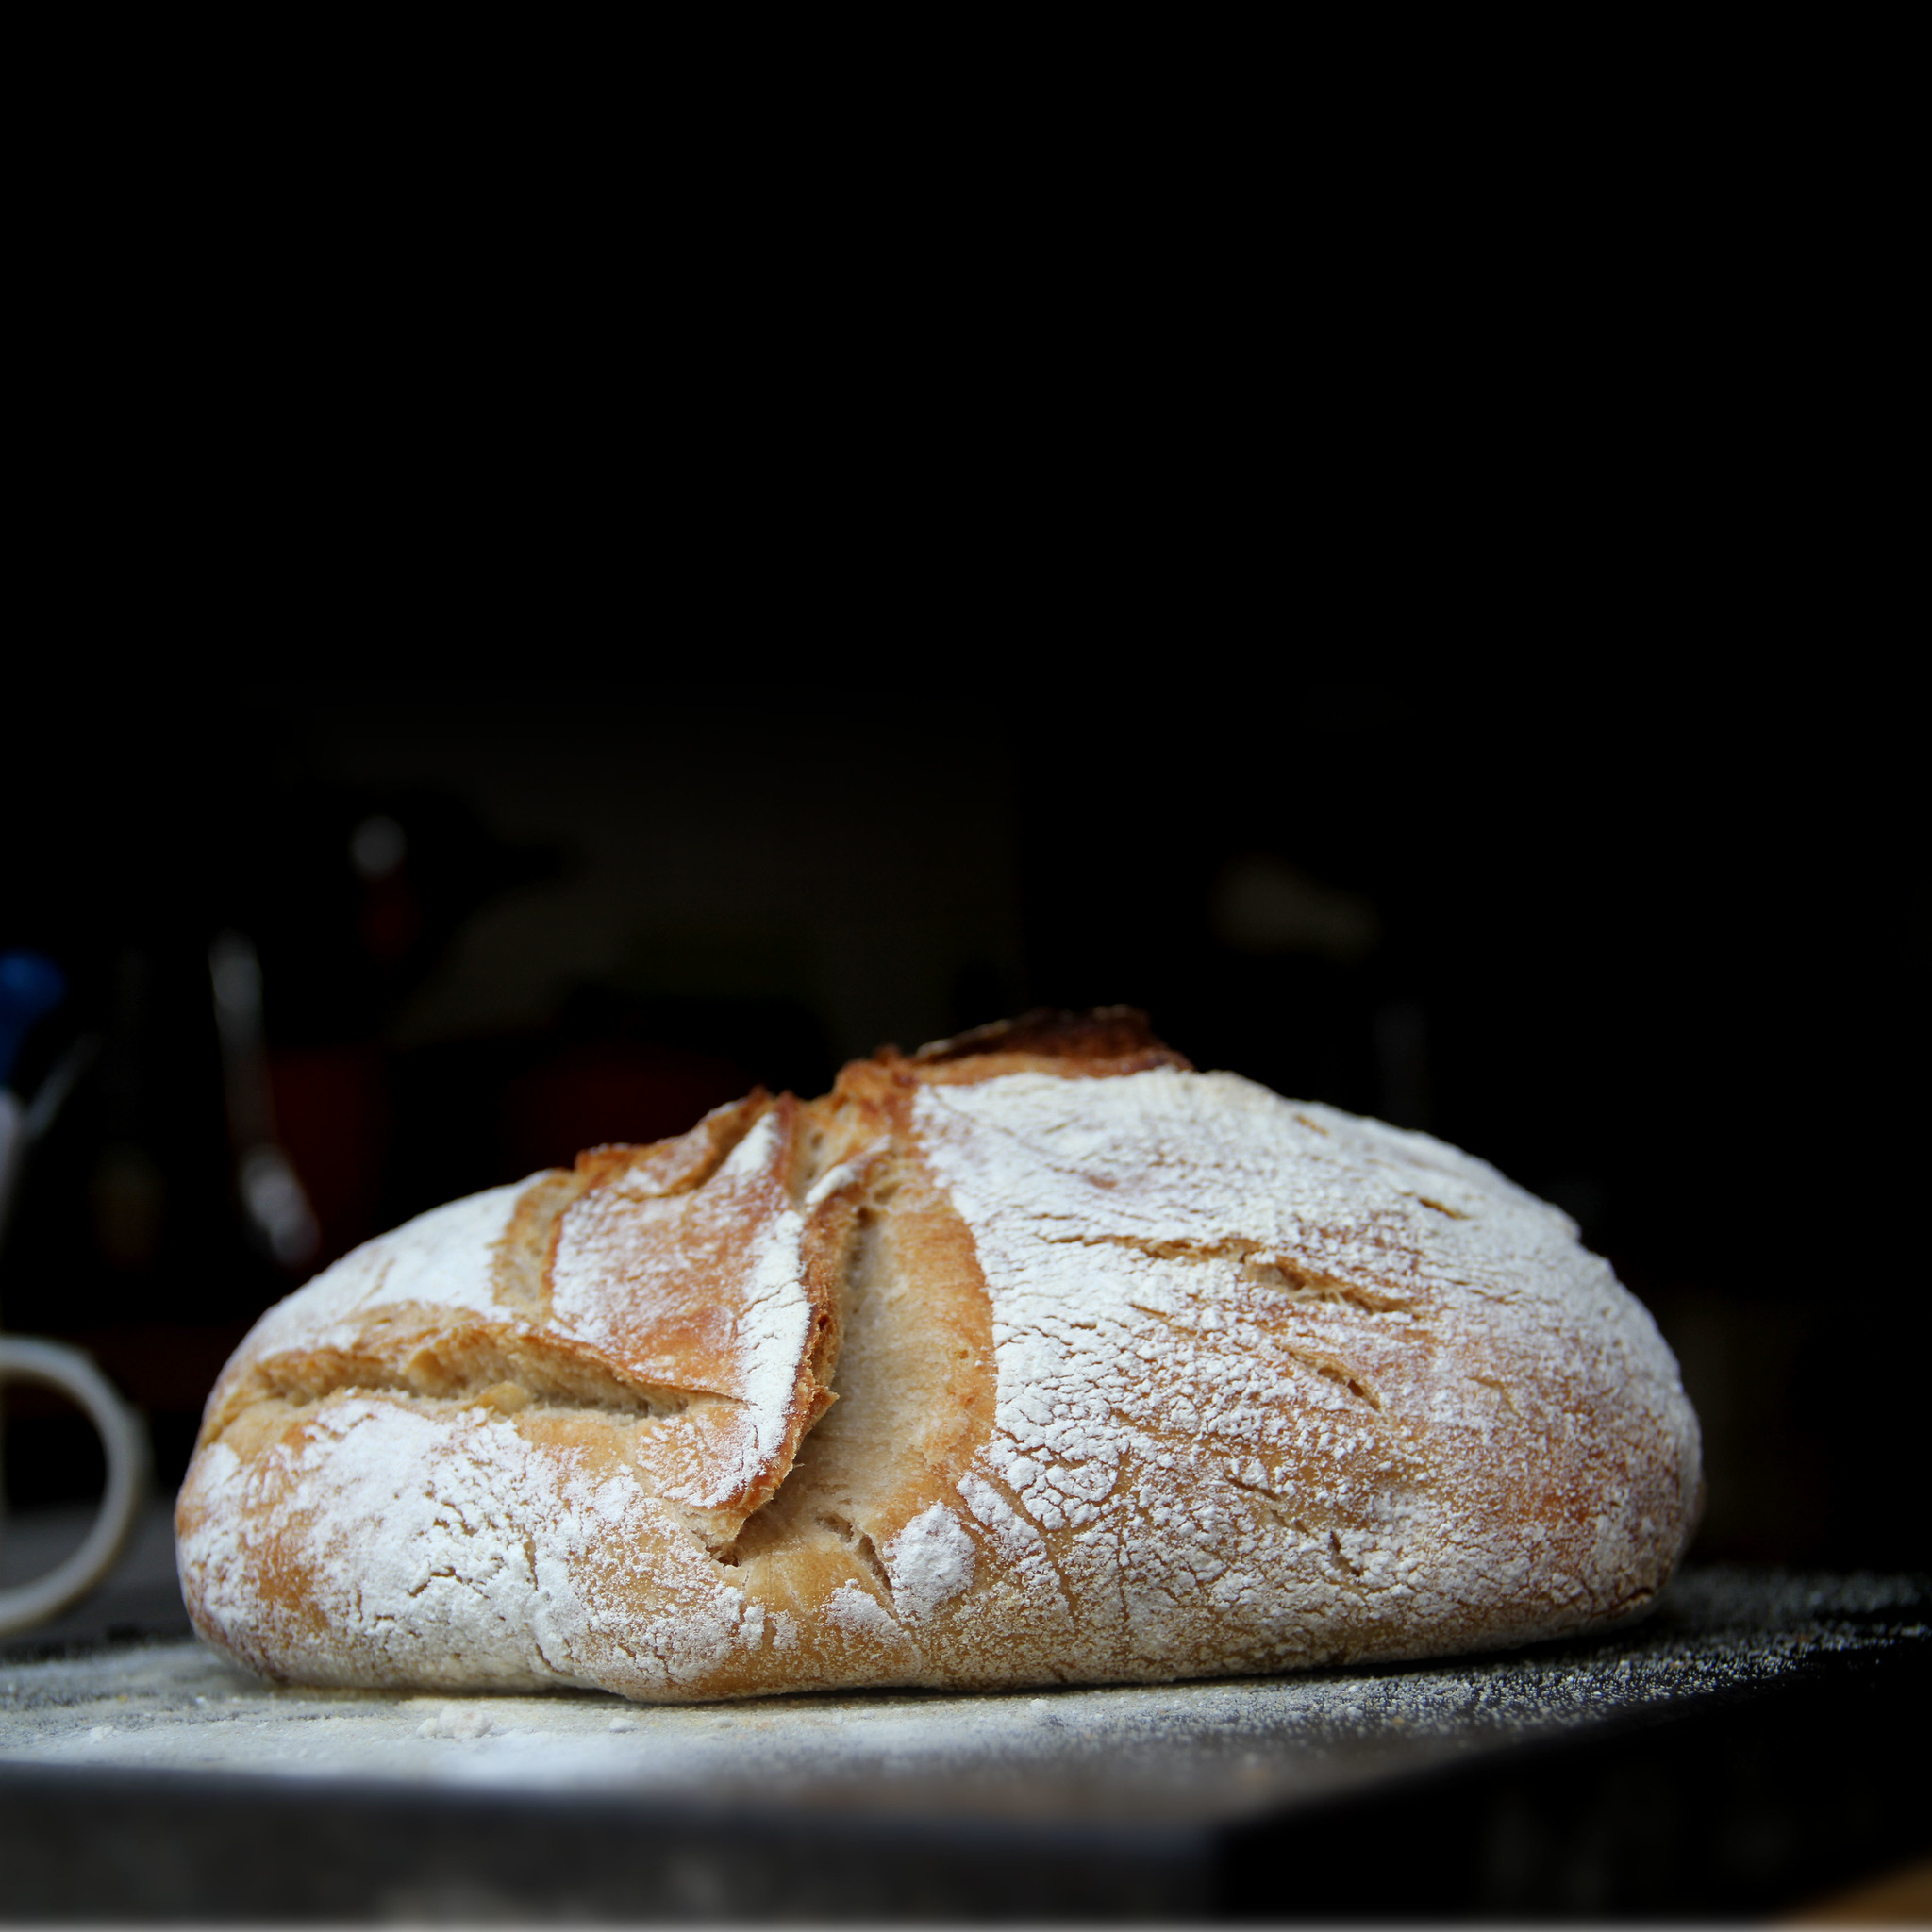
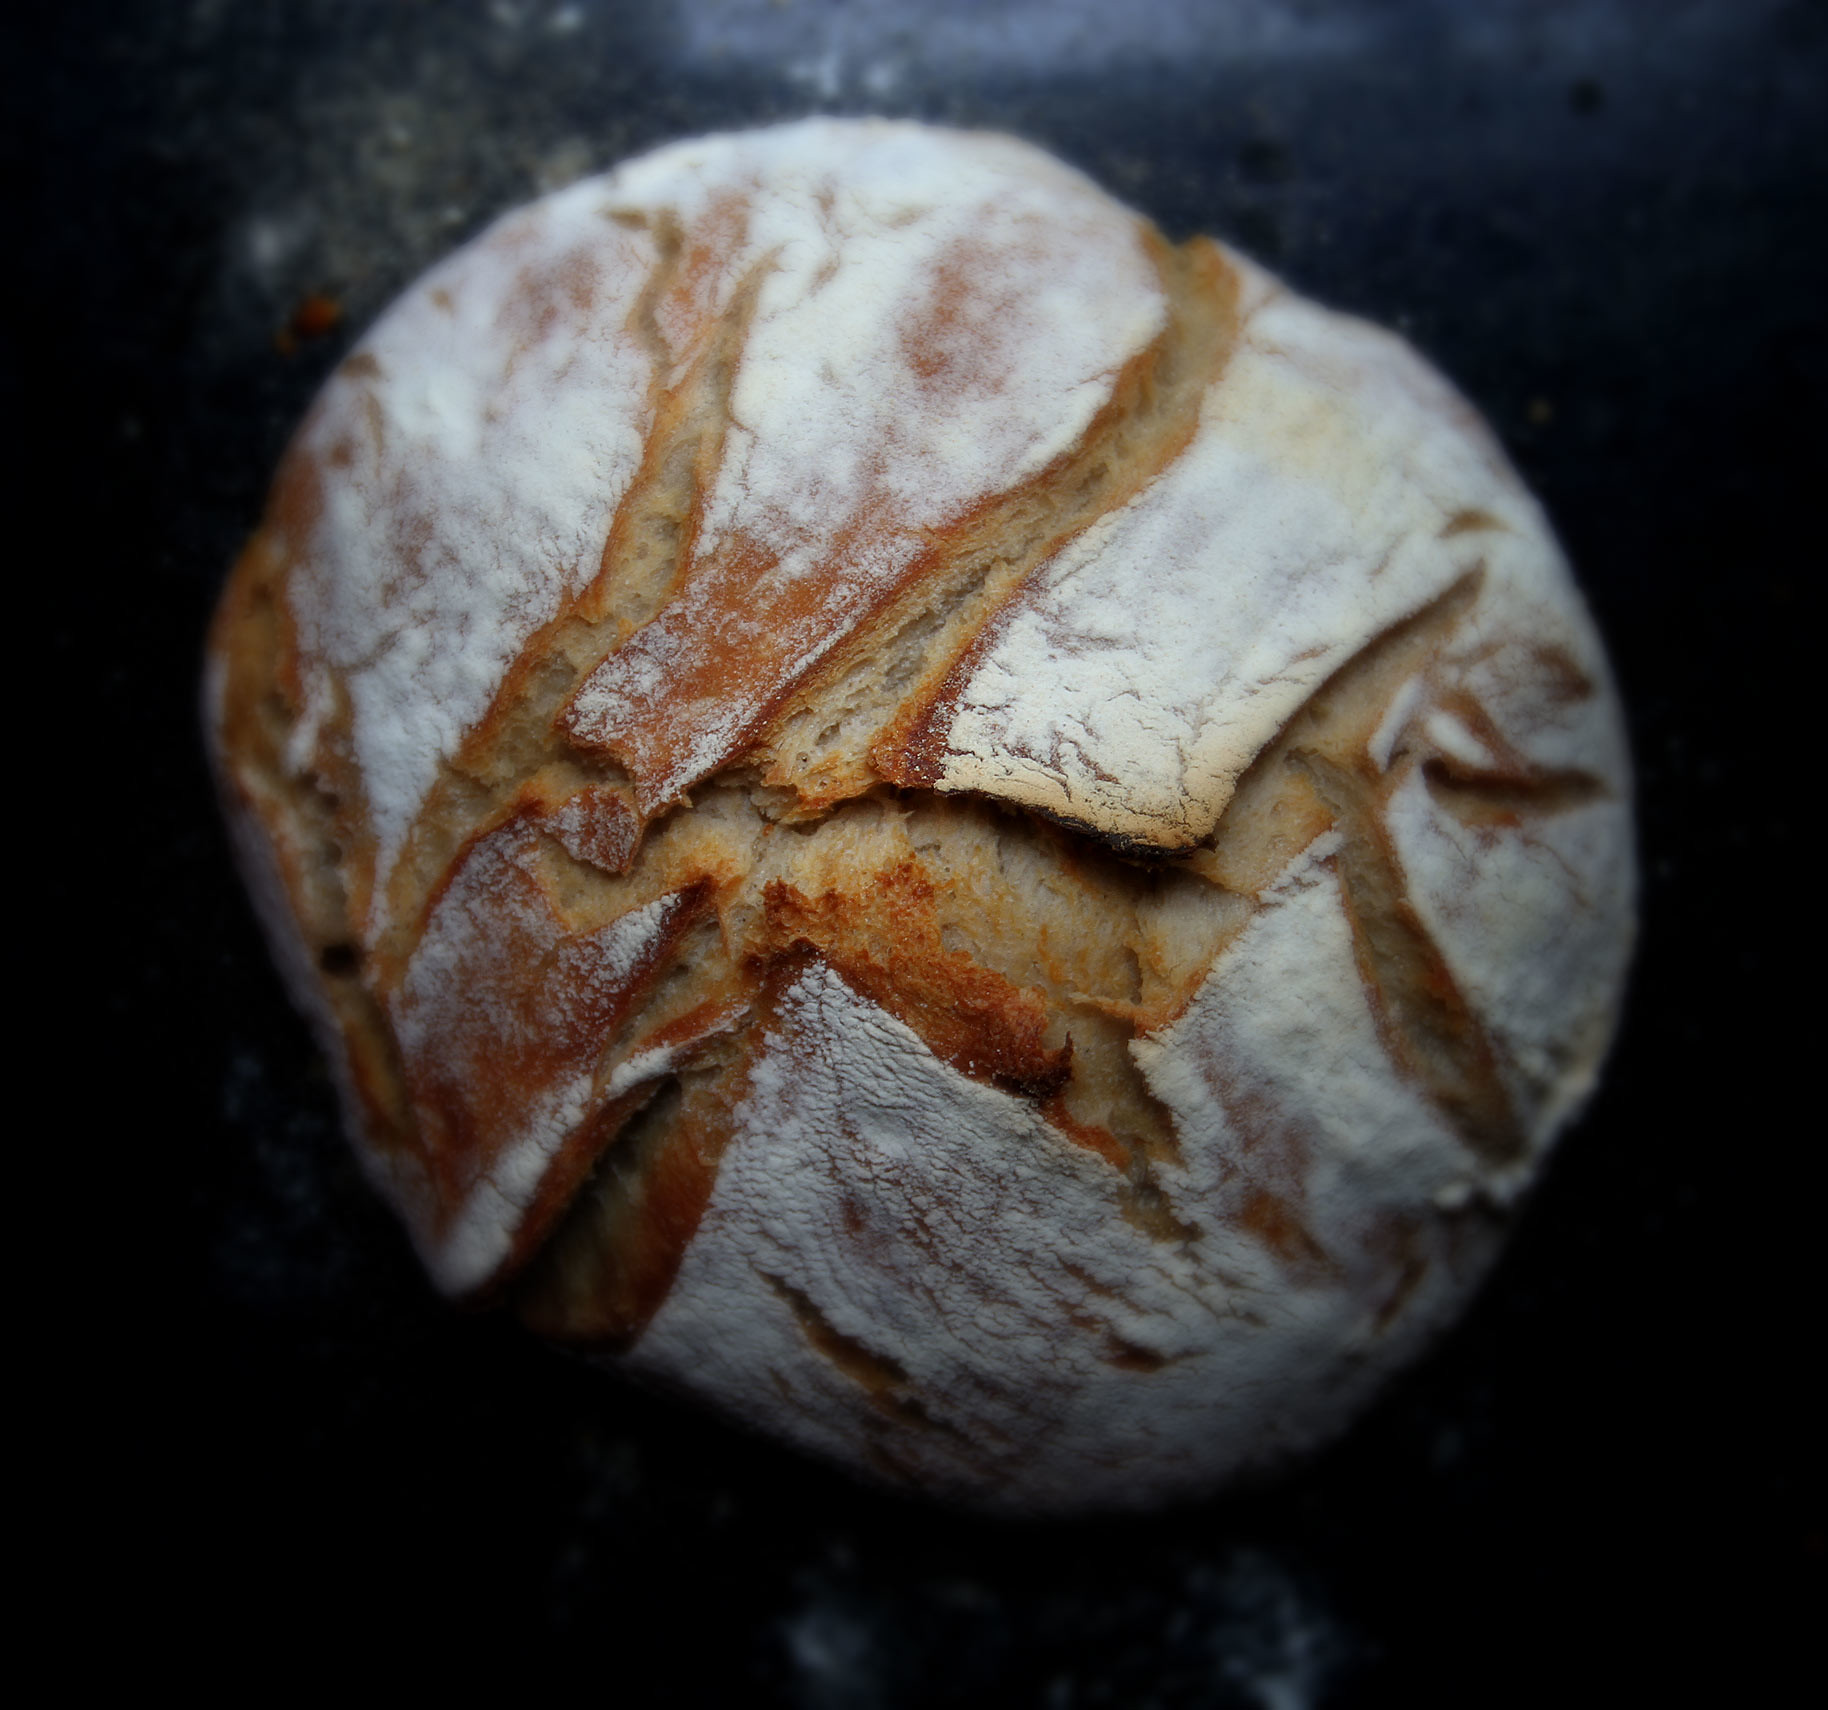
However, one moonless stormy night (last Saturday afternoon) we finally perfected our technique and brought into being a loaf of such profound beauty and character that we sank to our knees and praised the gods. Look if you dare at the photo below and behold beauty enbreadified, a redefinition of art, the zenith of human achievement.
Weep you unworthy fools.
Here’s the good news, not only is this recipe fool proof and delicious, it also doesn’t require any kneading. Also for this recipe (and this recipe only) we’ll be dispensing with proper grown up measurements and using the usually derided American Cup. Don’t worry if you don’t have an officially sanctioned and calibrated US Cup as we’re more concerned with proportions than exact quantities here. As a rough guide a US Cup is as near as damn it the same volume as a small British mug – you know, the tall, thin, delicate kind you only dig out when your mum comes to visit. If such casual and wanton disregard of accuracy causes you anxiety, the exact quantity of flour/water/air held by the us cup is 127g.
Preparation time: 5 – 10 minutes plus 8 hours proving
Cooking time: about an hour
Makes: 1 perfect loaf
Skill level: initially medium, subsequently easy
Ingredients
- sourdough starter – 1 cup
- strong white flour – 3 cups
- water – 1 cup
- salt – 2tsp
As so onto the process. Ideally (but not essentially) remove your starter from the fridge an hour or two before commencing in order to get it up to room temperature and allow the yeasts to wake up and have a good stretch.
Find yourself a large bowl and pour/slop in one cup’s worth of your starter.
Next add 3 cups of strong white flour (or whichever flour or combination of flours you choose to use), followed by one cup of (tap) water and 2tsp of salt.
Thoroughly mix everything together, first with a wooden spoon and then with your hands. Although sticky, the dough should form a lump which comes away from the side of the bowl.
Cover with cling film and set aside somewhere warmish for between 8 and 12 hours.
By the time you return to your dough it should have formed bubbles and roughly doubled in size.
Tip out onto a very well floured surface and (thinking of it as a rough square) gently fold an edge into the centre. Repeat with the other 3 ‘edges’. Repeat this process 3 or 4 times by which time you should have formed a rustic loaf shape with a sort of jagged top (this is what splits and forms the crowning crust).
Generously dust with polenta and carefully lift onto one half of a VERY well floured tea towel. Fold over the other half of the tea towel to cover.
Set aside for an hour or two.
Place a large Le Creuset casserole (with lid), or similar, in your oven and turn it up to as hot as it will go.
Allow 20 minutes for the pan to get VERY hot.
Remove the pan from the oven (you might need oven gloves) and chuck in some polenta.
Quickly but carefully flop the dough into the pan, put on the lid and return to the oven for 30 minutes.
Remove the lid, turn down the oven a couple of gas marks (40 degrees C or so) and bake for about another 30 minutes. You want a good brown crust which is just beginning to (but not quite) burn on the rough edges.
Tip out onto a wire rack, pour yourself a drink and admire your handiwork.
Confused? Then watch this video by Jules Clancy.
Also, don’t forget to feed your starter with one cup of flour and one of water.
Verdict: Excellent the first time … perfect by the third time. Chewy inside, crusty outside. A seriously good loaf.
Drink: Go on, you deserve it.
Entertainment: In the 10 or so hours this takes to make we would probably visit the ducks three times, the playground twice and the pub once.

First of all, sorry to hear about the… Event.
Secondly, that loaf is indeed a thing of immense beauty!
It has inspired me to yet another (final?) attempt at baking with sourdough. Although I consider myself a reasonably experienced baker I have so far failed miserably with the starter – I always end up with a dead, stinky mess in a jar (and it should be a bubbly, stinky mess, shouldn’t it?).
All the recipes I have followed have described the process as “easy” and “fool proof”, as, indeed, have you, and that has made me a tad… insecure because of my failures so far (an what does that make me?…).
Well, a yumblog recipe has yet to let me down, so I’m off to the raisin shop, thanks for the inspiration!
Hi aca
Thanks for your kind words. Pleased we have inspired you to have one last attempt at making a sourdough starter … It really is fairly straightforward, although don’t expect it to look as beautiful as some books/websites lead you to believe … ours is a greyish slurry sitting beneath a puddle of brown water, barely a bubble in sight … despite that it still makes great bread. Follow the recipe above (and watch the video) and we guarantee* a perfect loaf.
Let us know how you get on.
Best
R
*Subject to the usual terms and conditions, calls will be charged at your normal network rates, your house may be at risk if you fail to make a payment, etc.
My sourdoughs always taste great but are so flat. Just how do you get it to rise? I am thinking of cheating and adding a little yeast to the mix.
Hi Ian
I had exactly the same problem … trust me, follow this technique and you won’t go wrong.
There’s some nice stuff on your website by the way.
Best
R
Thanks.
I tried this bread technique twice – first one too doughy, second one too flat. Will try again – can only get better. Will let you know how it goes
Well Richard….the ‘starter’ travelled well ooop North and a lovely crusty chewy loaf was made – pic to come on FacePlant shortly 🙂
Hello. Found you while looking at the HFW sourdough thing on the guardian. Because I’ve now done his recipe three times and made delicious and very pretty bread but always with a slightly disappointing bottom.
Was looking for advice there, but thought I’d ask you instead – any ideas? How do I get a nice bottom (without excercise…)? Could I put Hugh’s recipe in the Le Creuset? (I like that idea very much) or should I just abandon him and try your version instead?
Hi Harriet, sorry to hear about your disappointing bottom. Putting your loaf on a heavy gauge baking sheet (or ideally baking stone) should do the trick. Sometimes once the cooking time is up I turn the loaf upside down and give it an extra 5 minutes to firm up the base. That said, I can see no reason why HFW’s recipe can’t be baked using the (infallible) Le Creuset technique. Have fun and experiment … it the loaf is a disaster you can always feed it to the ducks. Good luck.
R
Genius! Used your recipe, and felt very guilty about no kneading. Couldn’t at all see how it would work, but it came out of the oven about an hour ago, with a perfect bottom, and we’ve already eaten half of it (just another little bit….).
It’s not as sourdough-y in flavour as the loaves I made following HFW’s recipe, which seems odd as the starter’s the same, obviously, but it’s utterly delicious nonetheless, and I’d be proud to serve it to people.
Am contemplating re-blogging your recipe. Would that be ok?
Hi Harriet
Delighted it was a success. Feel free to reblog … just include a link back to Yumblog.
The sourdough flavour will get stronger as your starter matures … which reminds me, it is Yumblog Juniors birthday today, which means our starter is one year old.
All the best.
R
Followed it almost to the letter, near-perfect results from my first ever loaf with Dilys the Starter.
Had to cut the lid-off baking time to 15 mins due to the top catching (so middle perhaps not up to Ol’ Blue Eyes Hollywood’s standards), so will reduce the ferocity of my fan oven slightly for the next one. Which I am already planning. Does sourdough normally take over one’s life like this?!
Hi Sara
Delighted to hear you had a success and are filled with enthusiasm for the cult of sourdough. We are currently making irregular shaped sourdough rolls. Thanks for reading yumblog… please visit any time.
R
got this recipe from a friedn of mine and i am trying it out for the first time 😀 will post some results when i finished baking tomorrow 😀 greetz from nl
Interesting technique, although I thought kneading was necessary to give the gluten a workout and thus get a good ‘crumb’. However, I don’t have a Le Creuset; any idea if a ceramic pot would do the job? Presumably you just need something with plenty of thermal mass. Although why do you put the lid on? Anyway, thanks for sharing your secret system 🙂
Thanks for the recipe! The first that worked…and I’ve been trying for a while!
It is very easy, less messy than most, and what a great result! Cheers!
By the way, a US cup is a measure of volume, not weight — it’s actually 8 fluid ounces, and a fluid ounce is a tad under 30 ml, so a US cup is nearly 240 ml. A container holding 127 grammes of air would be a lot bigger than a cup!
I love making sourdough bread. I have a rye flour starter. I’ve a coldish /coolish kitchen – depends if you are from from the warmer south or North country person. I refresh the starter before breakfast. If it looks like it is a tad sluggish I use the yogurt maker wake it up! If I am in a hurry I chuck the, starter and flour mix in for the dough cycle in a very basic bread maker. I go about my business till I have time again…could be a hour or two…take the dough out and work it and shape it. Leave it to rise under a damp cloth and then bake when doubled in size. I have had some “failures” but none were inedible…mostly my bread turns out great…it lasts for ages too.
Hello Ms Yumblog, So love your stuff. You inspired me about sour dough some months ago. I do need to let you know I have bloody well cracked it big time. Really really really simple. Here it is, girl. You do a sloppy mix with yer starter and flour and water and leave it a few hours. Stage 2, you make it up into a drier, workable dough by adding flour and leave again a few hours. Stage 3 – rise in warm place for 20/30 mins and knead a couple of times. Stage 4 leave in fridge for several hours in its proving basket Stage 5 straight from overnight in fridge to scorching dutch oven as you say. Crackin. Love, Katy